The main goal of my case design is to improve the instrument’s thermal protection by effectively slowing heat transfer. To accomplish this, I explored various cooling solutions and thermal applications to determine the most effective approach.

Heat Transfer
There are three types of heat transfer: conduction, convection, and radiation. I first began by determining how to slow the process of heat transfer for each type.
Convection, the transfer of heat through a fluid, I realized would not affect the case as much as the other two because the case is not open during storage, but I determined that my case would be designed with a protective seal around the perimeter of the case so when it is shut air cannot pass through.
Conduction, the transfer of heat through a direct object, is the main form of heat transfer affecting the instrument case because the case has a large surface area and it will most directly affect the interior of the case. I decided that my case would incorporate a layer of insulation within the case that would slow the conduction.
Radiation, the transfer of heat through waves or particles, would hit the exterior of the case and quicken the process of heat transfer. To reduce absorption of heat due to radiation I decided to integrate a thermally reflective layer on the exterior of the case to reflect the radiation coming from different objects or for example the sun.
With research complete on the forms of heat transfer I moved onto examining the difference between passive and active cooling.
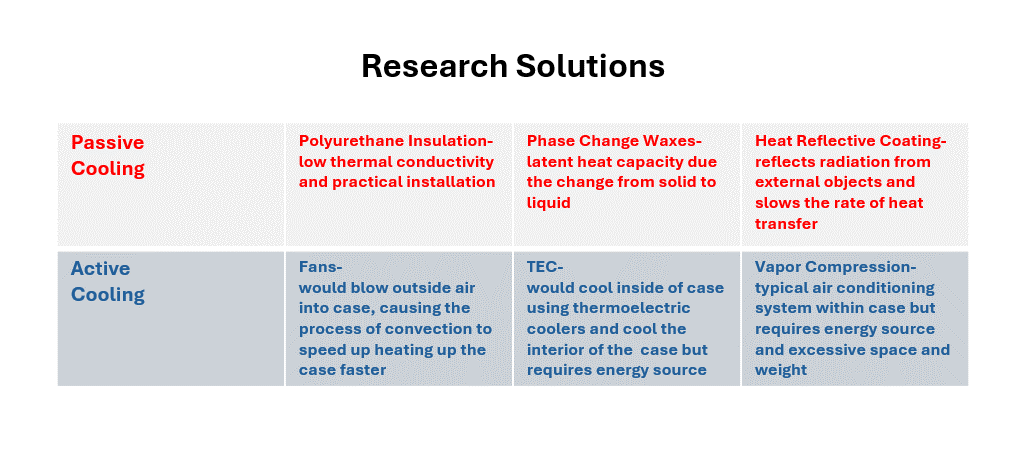
Passive Cooling vs. Active Cooling
There are two fundamental cooling systems: passive and active cooling. Passive cooling uses natural conduction, convection and radiation to cool an object. Active cooling requires the use of energy to specifically cool an object. To determine the best design approach for slowing heat transfer, I researched both options.
I initially explored active cooling and considered several methods. The first idea was to use fans, which could blow air from outside into the case. However, I realized that this would actually accelerate the temperature rise by blowing hot air from the outside environment, defeating the goal of keeping the case regulated. Next, I looked into combining TECs (thermoelectric coolers) with fans to blow cold air into the case, but this solution required a power source, such as a battery or outlet, and would take up too much space while adding excessive weight—making the case impractical to use. I also explored vapor compression cooling, a common system used in air conditioning for homes and cars. However, this method had the same drawbacks as fans: the need for an energy source and the addition of excessive size and weight. After evaluating these active cooling options, I decided to shift my focus to passive cooling.
Passive cooling, which does not require an energy source, seemed to be a better fit for my design. It could be seamlessly integrated into the case without adding unnecessary space or weight. I researched several passive cooling materials, including phase change materials (PCMs), insulation, and cooling gels. From these, I narrowed my focus to two promising materials: polyurethane foam and phase change waxes.
Polyurethane foam is commonly used in cooling containers and refrigerated trucks due to its numerous advantages. It is lightweight, durable, and offers excellent thermal insulation, with low thermal conductivity that slows down heat transfer. Phase change waxes, often used in thermal energy storage and electronics, also have their benefits. These waxes have a high latent heat capacity, meaning they can absorb and store a large amount of heat, helping to regulate temperature effectively.
While both polyurethane foam and phase change waxes offered significant benefits, I ultimately chose polyurethane foam. Its ease of installation, widespread use in cooling applications, and ability to effectively slow heat transfer due to its low thermal conductivity made it the optimal choice for my instrument case.
Design of Case
My design features a thick layer of polyurethane insulation that envelops the entire case, providing maximum thermal protection. After carefully considering the trade-offs between weight, size, and insulation, I decided on a 2-inch depth of polyurethane insulation. This thickness ensures an extended period of thermal protection compared to standard commercially available cases, while still maintaining a practical balance in terms of weight and size.
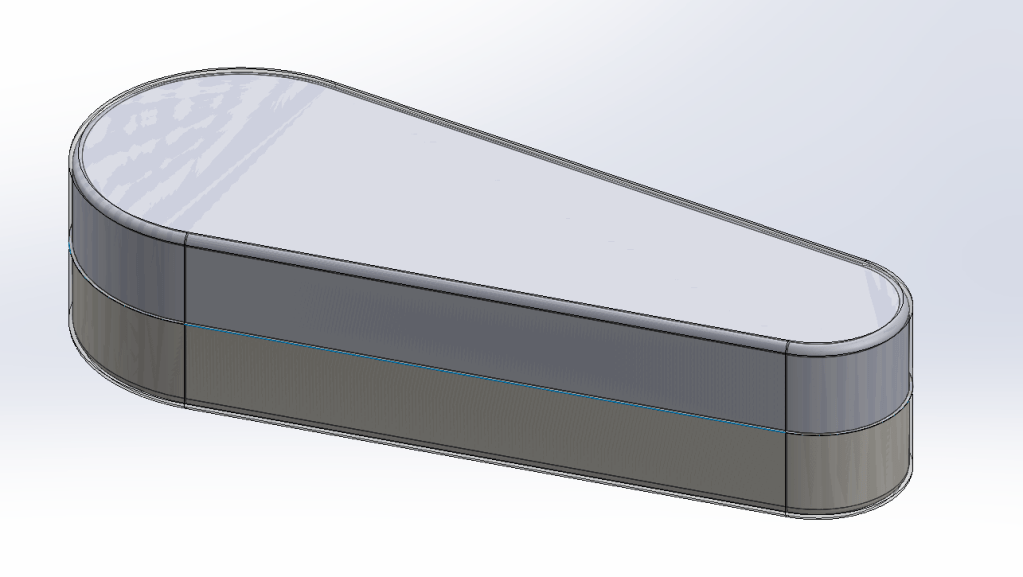
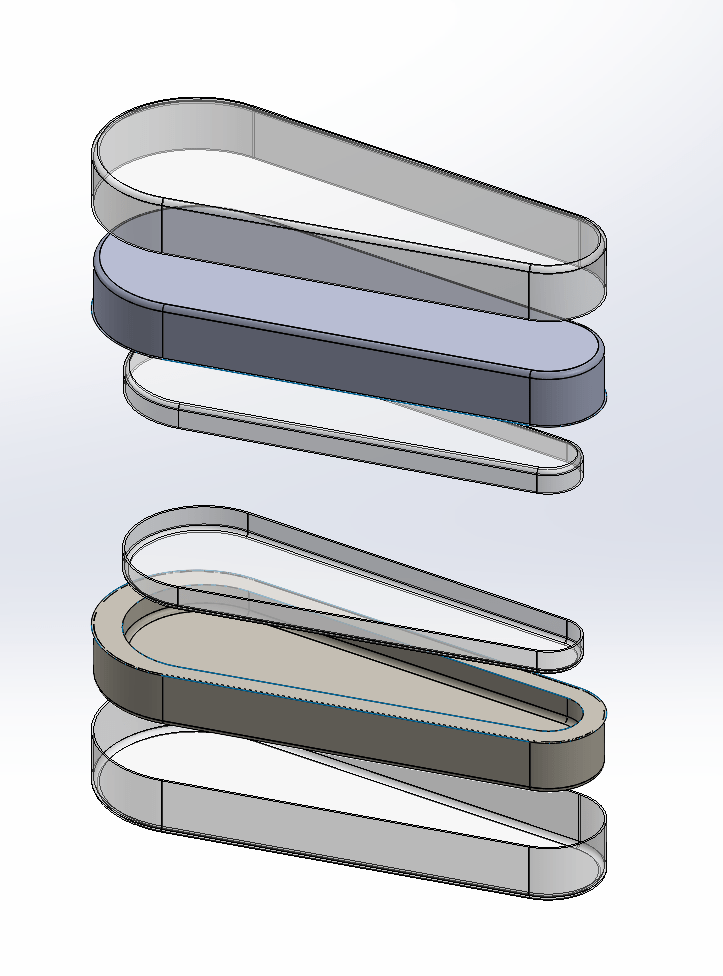
For the appearance, I chose an ovular shape to resemble typical instrument cases. The construction consists of an outer shell with a thermally reflective layer, followed by the 2-inch insulation layer, and an inner shell. The case is split into two halves to allow for easy opening, reinforced with internal supports to improve structural integrity. I started with sketches and gradually refined my design as I incorporated these complex layers.
Once the design and dimensions were finalized, I used CAD software to create an assembly model in SOLIDWORKS. This step gave me a more detailed and realistic representation of the case, allowing me to identify and fix any design flaws before moving into the prototyping stage.
Below are the SOLIDWORKS CAD designs of my final case including a assembly, exploded view, and drawing.
Climate Sound Case:
Exploded View of Case:
SolidWorks Case Assembly Drawing:

